EximiousSoft Logo Designer Pro

Logo Designer Pro provides you with solution that meets any requirement for design Logos. It offers over 5000 supreme quality logo templates and 6000 vector graphics symbols while keeps 20+ expert Drawing Tools for building amazing logos.

> Products > Logo Maker Software > Logo Designer Pro Guide > Using > How to Resize Objects

How to Resize Objects

1Select objects

If you want to adjust the size of some drawing elements, you first need to use the Selection Tool to select these objects.
2Do one of the following

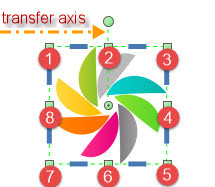
  • Click to drag for Resizing:When one or more objects are selected, eight green anchor points will appear in the border. These anchor points are the base points for the user to click and drag to achieve the object scaling. As shown below. Pay attention to the orientation of the transfer axis. No matter how the shape of the object changes. It is always perpendicular to the two sides of the frame and parallel to the other two sides.

    Resize Anchor Points

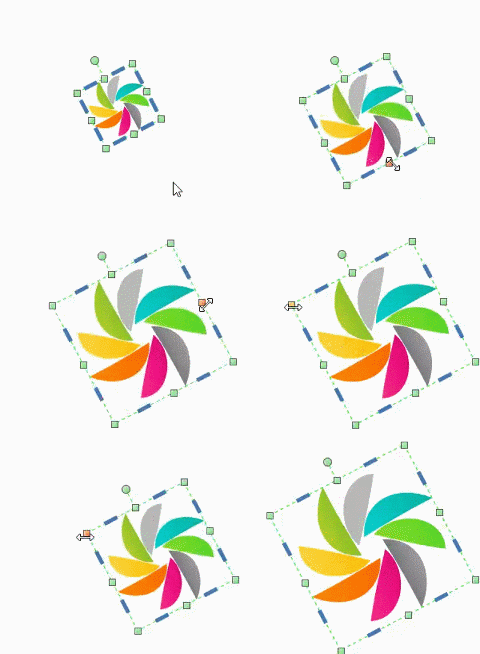
    Move the mouse over the above anchor point. When the mouse changes into a shape with a double arrow. Click the anchor point, keep the mouse pressed and perform the drag operation until the selected object changes to the desired size, and release the left mouse button.

    • If the drag is the second or sixth anchor point. It will be stretched along the transfer axis.
    • If the fourth or eighth anchor point is dragged, it will be stretched along the direction perpendicular to the transfer axis.
    • If you drag other anchor points, they will be stretched in both directions.
    • If you press the Ctrl key while moving the mouse, no matter which anchor point you drag. Both will be stretched at the same ratio in the above two directions.
    only Drag Drag and Press Ctrl Key
  • Set Dimension directly: The dimension mentioned here refers to the length and width of the smallest circumscribed rectangle of all selected objects. The so-called minimum circumscribed rectangle refers to the maximum range of several two-dimensional shapes expressed in two-dimensional coordinates, that is, the maximum horizontal coordinate, the minimum horizontal coordinate, the maximum vertical coordinate, and the minimum vertical coordinate in the vertices of the given two-dimensional shape define the lower boundary. rectangle. On the interactive interface it appears as a set of editing controls, which are deployed on the Main Ribbon Bar as part of the selection tool options.

    Set Dimension directly

    • Width: Set the width of the smallest circumscribed rectangle.
    • Height: Set the height of the smallest circumscribed rectangle.
    • Keep Aspect Ratio: It is checked to make all selected objects will be stretched horizontally and vertically at the same ratio.