EximiousSoft Logo Designer Pro

Logo Designer Pro provides you with solution that meets any requirement for design Logos. It offers over 5000 supreme quality logo templates and 6000 vector graphics symbols while keeps 20+ expert Drawing Tools for building amazing logos.

> Products > Logo Maker Software > Logo Designer Pro Guide > Editing > How to Edit Path

How to Edit Path

Unlike shapes created by shape tools, the Pen Tool and Freehand Tool create what is called paths. A path is a sequence of straight line segments and/or Bezier curves which, as any other drawing object, may have arbitrary fill and stroke properties. But unlike a shape, a path can be edited by freely dragging any of its nodes (not just predefined handles) or by directly dragging a segment of the path. Select this path and switch to the Node Tool.

1Choose Node Tool

When the Logo Designer Pro program is opened, click the "Path" tabbed item on the Main Ribbon Bar to switch to this category. Then find the "Node Tool" sub-category on the panel, and next to click the "Edit Path" toolbar button.

Logo Creation - Choose Node Tool to Edit Path

You can also double-click the path object on the canvas with the mouse, and Logo Designer Pro will automatically switch to Node Tool. Then you can freely edit and modify the path.

2Select Nodes

Logo Creation - Select Nodes for Editing Path

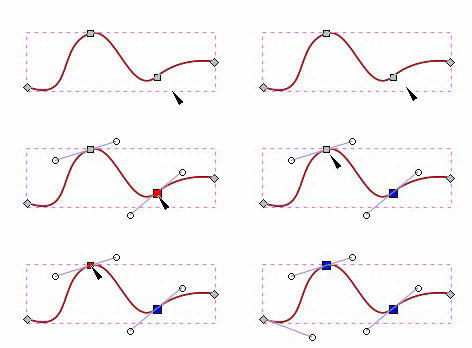
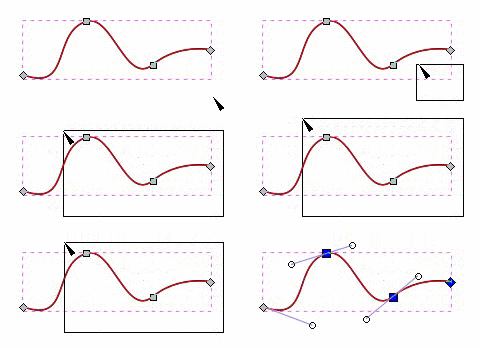
You will see a number of gray square nodes on the path. These nodes can be selected by Click, Shift + Click, or by dragging a rubberband - exactly like objects are selected by the Selection Tool. You can also click a path segment to automatically select the adjacent nodes. Selected nodes become highlighted and show their node handles - one or two small circles connected to each selected node by straight lines.

Logo Creation - Mouse Click to Select Node Logo Creation - Press Shift and Mouse Click to Select Nodes Logo Creation - Dragging Rubberband to Select Nodes
Mouse Click Shift + Click Dragging Rubberband

3Edit Path as follows

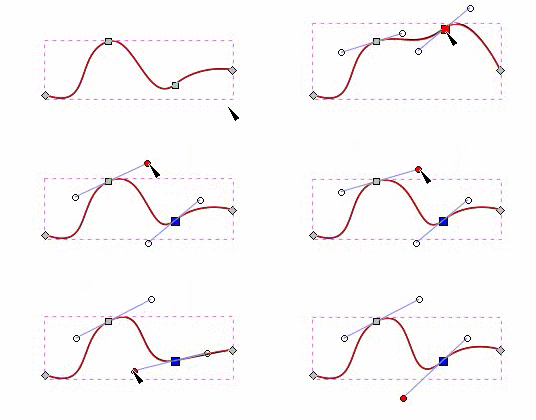
  • Edited by Dragging: Paths are edited by dragging their nodes, node handles, or directly dragging a path segment. Try to drag some nodes, handles, and path segments of the above path.
  • Logo Creation - Edit Nodes by Dragging

  • Insert Node: Insert new nodes into selected segments. You can add nodes anywhere on a path by either Double Clicking or by Ctrl + Alt + Mouse Click at the desired location. Remember, the point you click with the mouse should fall on the path, otherwise it will be unsuccessful. It is recommended to perform this operation after zooming in the graph. You can also add nodes by clicking the "Add Node" button on the toolbar. The newly added node is located in the middle between the selected nodes on the path.
  • Delete Nodes: Delete selected nodes. You can delete nodes with pressing Del key or Ctrl + Alt + Mouse Click. When deleting nodes it will try to retain the shape of the path, if you desire for the handles of the adjacent nodes to be retracted (not retaining the shape) you can delete with Ctrl + Del. You can also delete the selected nodes by clicking the "Delete Nodes" button on the toolbar.
  • Join Nodes: If you select Two Endnodes on one path, you can join them by pressing Shift + J or clicking the "Join Nodes" toolbar button.
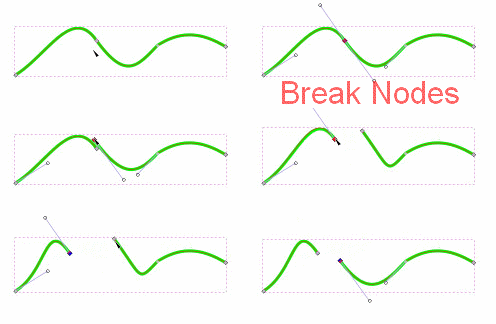
  • Break Nodes: Broke path at the selected nodes by pressing Shift + B or clicking the "Break Nodes" toolbar button.
  • Logo Creation - Join Nodes Logo Creation - Break Nodes
    Join Nodes Break Nodes
  • Join with Segment: Join selected endnodes with a new segment.
  • Delete Segment: Delete segment between two non-endpoint nodes.
  • Logo Creation - Join with Segment Logo Creation - Delete Segment
    Join with Segment Delete Segment
  • Node Cusp: Make selected nodes corner.which means its two handles can move independently at any angle to each other.
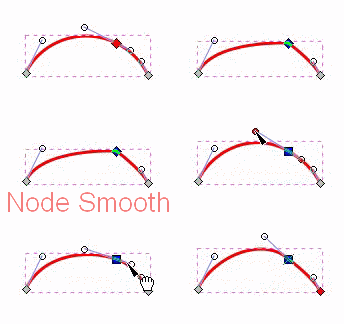
  • Node Smooth: Make selected nodes smooth. which means its handles are always on the same straight line (collinear).
  • Node Symmetric: Make selected nodes symmetric. which is the same as smooth, but the handles also have the same length.
  • Node Auto: Make selected nodes auto-smooth. a special node that automatically adjusts the handles of the node and surrounding auto-smooth nodes to maintain a smooth curve.
  • Node Line: Make selected segments lines.
  • Node Curve: Make selected segments curves.
Logo Creation - Node Cusp or Node Smooth Logo Creation - Node Line or Node Curve
Node Cusp / Node Smooth Node Line / Node Curve

Tip: When you switch the type of node, you can preserve the position of one of the two handles by hovering your mouse over it, so that only the other handle is rotated/scaled to match.

Also, you can retract a node's handle altogether by Ctrl + Mouse Clicking on it. If two adjacent nodes have their handles retracted, the path segment between them is a straight line. To pull out the retracted node, Shift + Mouse Drag away from the node.

  • X Coordinate: X coordinate of selected node(s). After entering the value in the edit box, press Enter key to confirm.
  • Y Coordinate: Y coordinate of selected node(s). After entering the value in the edit box, press Enter key to confirm.
  • Unit: Choose a unit which is used for display X & Y coordinates.
  • Show Clipping Path: Select it to show clipping path(s) of selected object(s).
  • Show Mask: Select it to show mask(s) of selected object(s).
  • Show Handles: Select it to show bezier handles of selected nodes.
  • Show Outline: Select it to Show path outline (without path effects).