Business Card Designer Pro

Business Card Designer Pro is equipped with featured design tools and 1000+ templates to create nice business cards quickly and easily. You can print the cards on your local printer or export your design as PDF or JPG files or bring to a professional printshop for printing.

> Products > Business Card Software > Business Card Designer Pro Guide > Editing > How to Clip Mask

How to Clip Mask

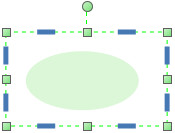
After the Business Card Designer Pro program is opened, click the "Object" tabbed item on the Main Ribbon Bar to switch to this category. Then find the "Clip & Mask" sub-category on the panel. Next here you will find toolbar buttons related to Clip and Mask. As shown below.

Business Card Creation - Clip & Mask ToolBar Buttons

  • Clip

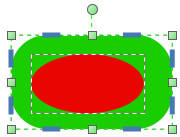
A clipping path is a closed vector path, or shape, used to cut out a 2D image or graphic. Anything inside the path will be included after the clipping path is applied; anything outside the path will be omitted from the output.
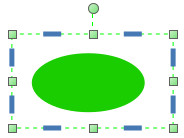
  • Set: Apply clipping path to selection. Before executing this function, you need to use the Selection Tool to select two or more objects. The vector path of the selected object displayed at the topmost level will be used as the clipping path.
  • Release: Remove clipping path from selection.
Business Card Creation - Original Graphic Before Clipping Path Business Card Creation - Apply Clipping Path Business Card Creation - Release Clipping Path
Original Graphic Apply Clipping Path Relase Clipping Path
  • Mask

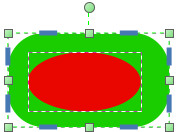
The process of applying the mask is essentially the result of mixing the transparency value (Alpha) of each point of the mask object with the transparency value of the corresponding point of the masked object(s). For example, if the Alpha value of a certain point of the mask object is 0, that is, fully transparent, then all the masked object(s) are invisible at this point. If the Alpha value is 255, that is, completely opaque, then all the masked objects are completely visible at this point. If the Alpha value is 128, then all the masked object(s) will be displayed in a semi-transparent manner at this point.
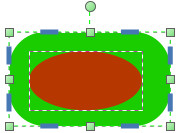
  • Set: Apply mask to selection. Before executing this function, you need to use the Selection Tool to select two or more objects. The selected object displayed at the topmost level will be used as the mask object.
  • Release: Remove mask from selection.
Business Card Creation - Original Graphic Before Apply Mask Business Card Creation - Apply Mask Business Card Creation - Apply Clipping Path
Original Graphic Apply Mask Apply Clipping Path
  • Tip: Although Clipping Path and Mask have some similarities, the difference between them can be seen from the figure above. Clipping Path has simple binarization characteristics. If a certain point is within the clipping range, then all clipped objects are completely visible at that point (Alpha=255). Otherwise, it is not within the clipping range, then all the clipping objects are completely invisible at this point (Alpha=0). The apply Mask will blend the transparency value of each point of the mask object with the transparency of the corresponding point of the masked object(s).