Widgets Bar
Widgets Bar contains a series of interactive windows. Each window is embedded in
the Widgets Bar in the form of a sub-page. Functionally, each window is independent
of each other. If you want to use the function of a certain subpage, please click
the corresponding tabbed button to make it to be the active window. If you accidentally
close the Widgets Bar, and now you need to use the function of one of the pages.
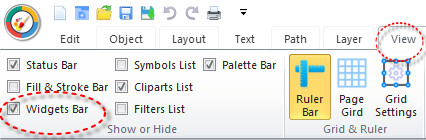
You can switch to the "View" category in the Main Ribbon Bar,
find the "Widgets Bar" checkbox button, click the button to make it selected . Or, in the Widgets
subclass on the right, find the button corresponding to the required function page,
and click the button to display the Widgets Bar.
|
|
|
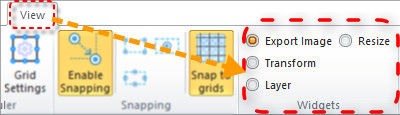
Make Widgets Bar Visible
|
Select a Radio Button
|
In Banner Maker Pro, the Widgets Bar contains four sub-pages. The order is: "Export
to Image" page, "Transform" page, "Layer" page, "Resize" page. The general function
of each page will be briefly described below. The more specific setting operation
for each page will be given in the following chapters.
- Export to Image : The main function
of this page is to export banner designs to images in PNG, JPG, BMP, TIF, TGA, ICO
and other formats. The page contains some controls for setting the export. You can
adjust the size of the output image according to actual needs. At the same time,
Banner Maker Pro supports to select the entire page or all drawing objects or some
selected objects as the export target. Of course, you can also customize the export
area. The function is very powerful.
- Transform : This subpage allows
the designer to manually perform coordinate transformation operations on the selected
graphic. For example, the selected object is translated on the canvas by a certain
distance, rotated by a certain angle along a certain center point, and the most
accurate scale number is input so that the figure has the most appropriate size. You can
also skew the object diagonally in the horizontal and vertical directions to
achieve the desired effect.
- Layer : In the real banner design,
each designer can truly feel each specific drawing object. The existence of layer
is relatively invisible. In fact, every drawing object will belong to a certain
layer. Whenever a new blank design is created, a layer is created by default. Objects
created in the future will be attached to this layer by default. On the page, you
can increase the count of layers, adjust the upper-lower relationship between layers,
move the drawing objects to other layers, and set the blending mode and opacity
of the layers.
- Resize : The Resize page has two very important functions:
- Resize Canvas: You can set the
size of the canvas according to actual needs. It should be noted that when the canvas
changes, the size of the drawing object above does not change synchronously. Sometimes
you need to adjust its size manually.
- Resize to Content: It is to set
the canvas size to just contain all the drawing content, the so-called minimum bounding
box effect. Of course, you are also allowed to adjust the white space on the upper,
lower, left, and right boundaries. They default to 0.