Banner Maker Pro offers professional graphic-designed tools and high quality prepared banner templates, cliparts, symbols, filters.
With which, you can design professional printable business banners and web-based graphics quickly and easily.
If you want to adjust the location of one or more drawing elements in the banner design,
you first need to use the Selection Tool to select these objects.
2Do one of the following
Click to drag the objects: Move
the mouse over the object until the shape of the mouse changes to that with four-headed arrow. Click on the objects, then keep the mouse pressed, and drag the drawing
objects to the desired position. Release the left mouse button. See below.
Set Coordinates directly:
When one or more objects are selected, the four points on the top, bottom, left,
and right make up a rectangular frame that completely covers these objects. The
setting coordinates mentioned here refers to setting the coordinates of the upper
left corner of the rectangle. The input interface corresponds to a set of editing
controls, which are all deployed in the Main Ribbon Bar as part of the Selection
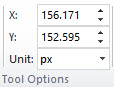
Tool options, as shown in the following figure.
X: Set the left coordinate of selected objects.
Y: Set the top coordinate of selected objects.
Unit: The default unit is pixel, do not modify it.
Press the arrow keys to move objects:
You can use the Left, Right, Up, and Down arrow keys on the keyboard to move objects.
By default, it moves 2 pixels at a time. If the Shift key is pressed at the same
time, it will move 20 pixels at a time.