EximiousSoft Banner Maker Pro

Banner Maker Pro offers professional graphic-designed tools and high quality prepared banner templates, cliparts, symbols, filters. With which, you can design professional printable business banners and web-based graphics quickly and easily.

> Products > Banner Software > Banner Maker Pro Guide > Editing > How to Align Objects

How to Align Objects

1Find Alignment Buttons

When the Banner Maker Pro program is opened, click the "Layout" tabbed item on the Main Ribbon Bar to switch to this category. Then find the "Alignment" sub-category on the panel. Next you will find these toolbar buttons. As shown below.

Banner Creation - Toolbar Buttons for Alignment

2Select the Objects

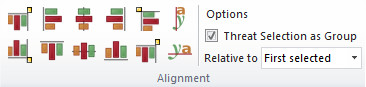
Please select the objects you want to do anlignment by using Selection Tool at first.
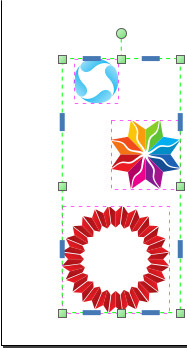
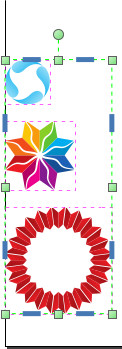
3Choose the most Suitable Options

  • Threat Selection as Group: Selecting this option means that all selected objects are combined into a whole, and then the top, bottom, left, right, center, etc. of the rectangular boundary of the combined object are aligned with the specified position of the target rectangular area. Unchecking this option means that the top, bottom, left, right, center and other positions of each independent object's own rectangular boundary are aligned with the specified position of the target rectangular area. As shown below.
  • Banner Creation - Before Do Left Alignment Banner Creation - Threat Selection as Group is Checked Banner Creation - Threat Selection as Group is Unchecked
    Before Do Left Alignment The Option is Checked The Option is Unchecked
  • Relative to: This option determines which area is applied as the alignment target.
    • Last Selected: Use the rectangular boundary of the last selected object as the alignment target.
    • First Selected: Use the rectangular boundary of the first selected object as the alignment target.
    • Biggest Object: Among all selected objects, the object with the largest rectangular boundary area becomes the alignment target.
    • Smallest Object: Among all selected objects, the object with the smallest rectangular boundary area becomes the alignment target.
    • Page: The rectangular boundary of the Canvas is used as the alignment target.
    • Drawing: The rectangle boundary where all drawing objects are located is used as the alignment target.
    • Selection Area: The rectangle boundary where all selected objects are located is used as the alignment target.

4Do Alignment

  • Align Right to Left: Move the selected objects so that the right borders of the bounding rectangles and the left border of the alignment area are in a straight line.
  • Align Left: Move the selected objects so that the left borders of the bounding rectangles and the left border of the alignment area are in a straight line.
  • Align Center: Move the selected objects so that the horizontal center of the bounding rectangles and the horizontal center of the alignment area are in a straight line.
  • Align Right: Move the selected objects so that the right borders of the bounding rectangles and the right border of the alignment area are in a straight line.
  • Align Left to Right: Move the selected objects so that the left borders of the bounding rectangles and the right border of the alignment area are in a straight line.
Banner Creation - Original Layout Banner Creation - Align Right to Left Banner Creation - Align Left
Original Layout Align Right to Left Align Left
Banner Creation - Align Center Banner Creation - Align Right Banner Creation - Align Left to Right
Align Center Align Right Align Left to Right
  • Align Bottom to Top: Move the selected objects so that the bottom borders of the bounding rectangles and the top border of the alignment area are in a straight line.
  • Align Top: Move the selected objects so that the top borders of the bounding rectangles and the top border of the alignment area are in a straight line.
  • Align Middle: Move the selected objects so that the vertical center of the bounding rectangles and the vertical center of the alignment area are in a straight line.
  • Align Bottom: Move the selected objects so that the bottom borders of the bounding rectangles and the bottom border of the alignment area are in a straight line.
  • Align Top to Bottom: Move the selected objects so that the top borders of the bounding rectangles and the bottom border of the alignment area are in a straight line.
Banner Creation - Original Layout Banner Creation - Align Bottom to Top Banner Creation - Align Top
Original Layout Align Bottom to Top Align Top
Banner Creation - Align Middle Banner Creation - Align Bottom Banner Creation - Align Top to Bottom
Align Middle Align Bottom Align Top to Bottom
  • Align Text Horizontally: Align all text objects horizontally to the baseline anchor point.
  • Align Text Vertically: Align all text objects to the baseline anchor point in the vertical direction.
Banner Creation - Original Layout Banner Creation - Align Text Horizontally Banner Creation - Align Text Vertically
Original Layout Align Text Horizontally Align Text Vertically