EximiousSoft Banner Maker

The program is a powerful yet easily software for creating banner ads. Web buttons and headers etc. web graphics. It provides a full set of professional image-editing tools and friendly interface to compose GIF, JPG, PNG images.

> Products > Banner Maker > Banner Maker Guide > Editing > Effects

Effects

Sometimes, when you create a banner, you may need some very powerful effects to enhance the banner's appeal and visual impact on the user. EximiousSoft Banner Maker provides many powerful rendering tools. Such as: Drop Shadow, Reflection, Outer Glow, Bevel Edge, Texture and so on. Just click the mouse button , you can get it quickly and easily.

Drop Shadow

1Use preseted drop shadow settings

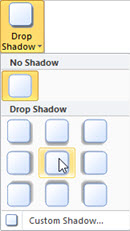
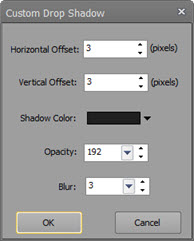
Move the mouse button to "Effects" sub-categroy, Click "Drop Shadow" tool button. Banner Maker wills pop-up a rectangular box with multiple common shadow settings. Move the mouse to a shadow item, you will be in banner edit view preview that all selected vector shapes should be shown with the shadow setting. If you are satisfied with the setting, click on this item with mouse button to complete. If you need to do more personalized shadow configuration, click "Custom Drop Shadow" tool button.
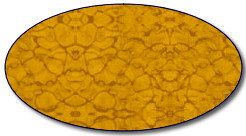
List preseted settings Custom drop shdaow Rendered with drop shdaow

2Custom Drop Shadow

  • Horizontal Offset: to set the horizontal distance that the shadow is drawn of the object.
  • Vertical Offset: to set the vertical distance that the shadow is drawn of the object.
  • Shadow Color: to choose a color for the shadow, click shadow Color button, and then click the color that you want. To change to a color that isn't in the theme colors, click "More Colors" button, and then either click the color that you want on the Standard tab, or mix your own color on the Custom tab.
  • Opacity: to specify how much you can see through the shadow. You can vary the degree of Opacity from 0 (fully transparent) to 255 (fully opaque, the default setting).
  • Blur: to set the radius of the blur on the shadow. The larger the radius, the blurrier, or "fuzzier", the shape or text will be.

Reflection

1Use common reflection settings

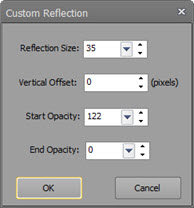
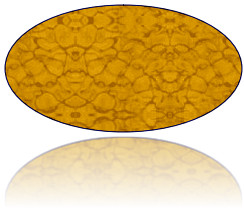
Move your mouse button to "Effects" sub-category, and click the "Reflection" tool button. The banner application will pop-up a rectangular box with multiple reflections commonly used settings. Move the mouse to a reflection setting item. you will be in banner edit view preview that all selected vector shapes should be shown with this reflection setting. If you are satisfied with the settings items, just click the mouse button to complete. If you need to do more personalized Reflection Configuration, Please click “Custom Reflection…” tool button.

List preseted settings Custom reflection Rendered with reflection

2Custom reflection

  • Reflection Size: To specify the reflection size. Move the "Size" of the slider, or in the box next input a number. The larger the number, the greater the size of the reflection. This is based on the percentage of it will be applied to the size of the object. The range is 0%(without reflection) to 100%(reflection all the object. For example, set 100, the reflection has the same height as original object, set 50, only half of original object.
  • Vertical Offset: If you want to specify the distance between the reflective objects and reflection, please move the slider, or in the box next to the slider input number. The larger the number is, the reflection from the more distance.
  • Opacity: for setting the reflection that in the area behind the clarity. It ranges from 0 (fully transparent) to 255 (fully opaque). Start opacity is used to specify the transparency of the top representative of reflection, End Opacity is used to specify the transparency of the bottom reflection, while the rest of the reflection of transparency, gradual transition from top to bottom gradually.

Outer Glow

1Use common outer glow settings

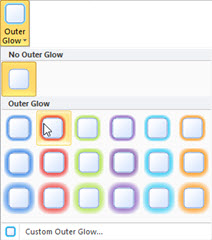
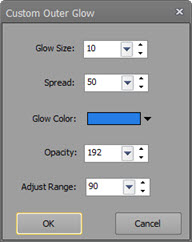
Move the mouse button "Effects" sub-category, click "Outer Glow" tool button. The banner program wills pop-up a rectangular box with multiple common outer glow Configuration. Move the mouse to an outer glow preset item, You will be in banner edit view preview that all selected vector shapes should be shown with this outer glow setting. If you are satisfied with setting item, just click the mouse button to complete. If you need to do more personalized outer glow configuration, please click "Custom Outer Glower..." tool button.

List preseted settings Custom outer glow Rendered with outer glow

2Custom Outer Glow

  • Glow Size: Specify the size of the glow. Please move the size of the slider or input a number next to the box beside the slider. The larger the number,the larger the size of glow.
  • Glow Color:Create a custom color for the glow, please click color button, then click on the required color. To change the color that the theme color don't include,please click "More Colors" tool button, and then click the requirement color in the "Standard" tab, or mix your own colors in the "Customer" tab. If you change the word theme later, custom colors and the "Standard" tab colors are not updated.
  • Opacity: Specifies the visibility of the luminous, please move the "Opacity" slider or input a number next to box beside the slider. Transparency percentage ranges from 0(completely transparent, default) to 255(completely opacity).
  • Spread: Specifies the size of the visible part of luminescence, please move the "size" slider or input a number in the box beside the slider. The larger the number is, the more luminous the visible part.
  • Adjust Range: together with Opacity, adjust visibility of light in linear. Please move the "Adjust Range" slider or input a number next to box beside the slider. Range percentage can be changed from 1 to 100.

Bevel Edge

1Use common bevel edge settings

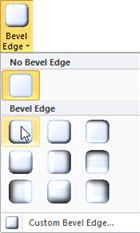
Moves the mouse button to "Effects" sub-category, click "Bevel Edge" tool button. Banner Maker wills pop-up a rectangular box with multiple common Bevel Edge configurations. Move the mouse to a preseted item for bevel edge, You will be in banner edit view preview that all selected vector shapes should be shown with this setting. If you are satisfied with the item setting, just click mouse button to complete. If you need to do more personalized bevel edge configuration, please click "Custom Bevel Edge…" tool button.

List preseted settings Custom bevel edge Rendered with bevel edge

2Custom Bevel Edge

  • Azimuth: It is defined as a intersecting angle between horizon of the pane which the object is in 3D space and the light projection for the pane.
  • Elevation: It is defined as an intersecting angle between the pane which the object is in and the light in 3D space.
  • Bevel Width: It is defined a range how to close to edge then the inner pixels should be processed for bevel.
  • Enable Bevel: This option is decide to whether bevel the edges of the object or not. When it is not selected, all other controls which are used for bevel edge are shown as disable.

Texture

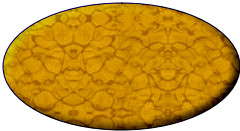
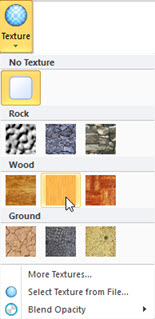
Move the mouse button to "Effect" sub-category, click "Texture" tool button. Banner Maker wills pop-up a rectangular box with many material textures. Move the mouse button to a texture material item, You’ll be in banner edit view preview that all selected vector shapes should be shown which are rendered by this texture setting. If you are satisfied with texture, just click mouse to complete. If you need more texture material from this banner program, please click on "More Textures…" tool button. If you need an image file as a texture, click the "Select Texture from File ... "tool button.

List preseted settings Rendered with Texture

Blend Opacity: used to specify the texture and vector graphic mixed in the weight, the larger the value is, the more powerful the texture highlighted.